Importance of Proper Roofing and Windows Installation in Your Home
Beautiful ceilings make the house more valuable and functional. People always seek to improve the exterior appearance of their homes. They also want the most durable, maintenance-free material that can last longer and substantially improve property value. Service providers offer a perfect combination of roofing services from installation, repair to analysis report.
A roof has two functions: insulation and drainage. Insulation protects the house or any establishment not only from the weather, but also from noise and birds.
The roof serves as a drain for, for example, snow that accumulates on the top of your roof or perhaps rain. Gutters are installed to conduct water caused by rain or snow melt to the ground so that your home ventilation is not disrupted. If gutters are not installed, water may run down the walls of your home or building or may seep onto your property.
The roof of an establishment varies according to the climate and the type of establishment you have. For commercial establishments, they generally have flat roofs because it is the simplest roof to build; the simpler, the lower the cost. The hip roof is commonly for residential houses; This roof has four slopes, which can be square and rectangular. On the other hand, an A-frame roof is commonly used for churches, country houses, or other types of homes; This type of roof serves as a roof and wall for the entire infrastructure. There are so many types of roofs. You can choose any of those for your home, but note the compatibility of the ceiling with your home.
In addition to having different types of roofs, the materials used for the roof also vary depending on the roof design and the type of place you live in.
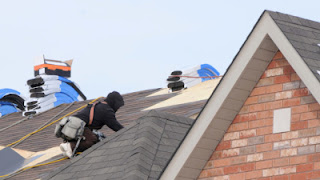
Like other things, the roof of your house or any establishment can also be damaged by certain causes, such as storms, cyclones, heavy rains, etc. If not properly cared for, you may need to change materials like clay shingles, asphalt shingles, concrete shingles, metal, slate, wood shingles, or whatever type of roof you have, and this will come at a costly cost. We want our roof to last, so here are some tips on proper installation and maintenance.
Find the right materials
When getting the right materials for your roof, you need to invest in materials that can: last a long time, protect the house from natural disasters, not too heavy for the roof structure, must complement the style of the house or building and , if allowed by local building codes.
Install the roof cover guard
It is better to hire a roofing contractor. You cannot do this process yourself, you will need trained and experienced roofing contractors for proper roof installation. Roof Deck Protection prevents windblown rain from entering your shelter, another reason you need to install it is so that your shingles stay flat and clean.
Leak Barriers Installation
Your roof should have a leak barrier, especially at the edges where it is prone to leaks. This must be done to reduce the risks of damaging your roof.
Roof tile installation
It is important to nail the shingles at the correct angle. The installation of the first line of tiles must be done without error, since it serves as the basis for the installation of the other tiles. It must have a strong base to avoid damage when a storm hits.
Flashing installation
Flickering is another material to protect the water from your roof. It is commonly placed in areas where it is prone to leaks such as valleys and vent pipes.
Installing replacement windows in your home is not too complicated a task to complete, but it should be given a reasonable amount of time and will require some skill to complete to a reasonable level. Once you've read a bit about what a complete home replacement involves, you should be ready to go.
It will usually take around 4 hours to completely replace a large window, and of course you will need several tools to get the job done. Most people have these tools around the house and they include things like a hammer, screwdriver, chisel, knife, tape measure, square, wood wedges, wood putty, caulking pipe, sandpaper, expansive foam and a lever. Once you have gathered all of your tools, you can proceed to measurement for installation.

No matter what type of window you are using, the essential measurement items are basically the same from unit to unit. It is important that this is done well because everything else you do will come out of this.
When the measurement process begins, you will need to get 6 measurements in total, 3 along the horizontal aspect and 3 along the vertical aspect. Height and width measurements are taken from the window jamb to the window jamb, this basically refers to the inner edge of the window frame. It is important that 3 measurements are taken along both axes, one to the left, middle, and right when measuring height, and one to the top, middle, and bottom when taking measurements for height. You can see that these measurements are not all the same, if this is the case, you should take the smallest height and width measurement, these will be the dimensions of your new window.
The first thing that will be removed will be the window stops, these are the things that hold the window in place within the frame. In older windows, it may be just a case of unscrewing or using a knife to cut the edges. You should try not to damage the window bumpers if possible as they can be reused and save a little extra money.
The next step should be fairly straightforward now that the window stops have been removed, you will need to remove the window frames or window pane, depending on the type of window currently installed. Because the stops hold the window in place, the sash or panel needs to be lifted with very little effort.
Finally, you need to extract the separation beads to allow you to remove the top part of the window sash, if it is a casement window, you often will not have a separation cord in the installation. Now that your window is outside, you can fill in the holes in your window jambs, smooth them out, and prepare them for new windows.
The final part of the process is the most difficult, installing the new replacement window. The first part of the process will be putting a caulking bead along the inside of the outer bumpers, this is where the replacement windows will finally be placed. Then you can go ahead and install the first part of the window, which will be the window header, which needs to be installed in the jamb of the top window.
Next, you'll insert the replacement window unit into the square hole and see if it clicks into place. If the window does not fit well because it is too small, you will need to tap some wooden wedges in place to fit snugly into the hole in the window. Once the window is securely attached, you can screw the window into the jamb to secure it in place.
Now you can go ahead and check if your replacement window works well, try to open and close the main parts of the unit and make sure the parts that shouldn't move don't move.
A roof has two functions: insulation and drainage. Insulation protects the house or any establishment not only from the weather, but also from noise and birds.

The roof serves as a drain for, for example, snow that accumulates on the top of your roof or perhaps rain. Gutters are installed to conduct water caused by rain or snow melt to the ground so that your home ventilation is not disrupted. If gutters are not installed, water may run down the walls of your home or building or may seep onto your property.
The roof of an establishment varies according to the climate and the type of establishment you have. For commercial establishments, they generally have flat roofs because it is the simplest roof to build; the simpler, the lower the cost. The hip roof is commonly for residential houses; This roof has four slopes, which can be square and rectangular. On the other hand, an A-frame roof is commonly used for churches, country houses, or other types of homes; This type of roof serves as a roof and wall for the entire infrastructure. There are so many types of roofs. You can choose any of those for your home, but note the compatibility of the ceiling with your home.
In addition to having different types of roofs, the materials used for the roof also vary depending on the roof design and the type of place you live in.
Like other things, the roof of your house or any establishment can also be damaged by certain causes, such as storms, cyclones, heavy rains, etc. If not properly cared for, you may need to change materials like clay shingles, asphalt shingles, concrete shingles, metal, slate, wood shingles, or whatever type of roof you have, and this will come at a costly cost. We want our roof to last, so here are some tips on proper installation and maintenance.
Find the right materials
When getting the right materials for your roof, you need to invest in materials that can: last a long time, protect the house from natural disasters, not too heavy for the roof structure, must complement the style of the house or building and , if allowed by local building codes.
Install the roof cover guard
It is better to hire a roofing contractor. You cannot do this process yourself, you will need trained and experienced roofing contractors for proper roof installation. Roof Deck Protection prevents windblown rain from entering your shelter, another reason you need to install it is so that your shingles stay flat and clean.
Leak Barriers Installation
Your roof should have a leak barrier, especially at the edges where it is prone to leaks. This must be done to reduce the risks of damaging your roof.
Roof tile installation
It is important to nail the shingles at the correct angle. The installation of the first line of tiles must be done without error, since it serves as the basis for the installation of the other tiles. It must have a strong base to avoid damage when a storm hits.
Flashing installation
Flickering is another material to protect the water from your roof. It is commonly placed in areas where it is prone to leaks such as valleys and vent pipes.
Installing replacement windows in your home is not too complicated a task to complete, but it should be given a reasonable amount of time and will require some skill to complete to a reasonable level. Once you've read a bit about what a complete home replacement involves, you should be ready to go.
It will usually take around 4 hours to completely replace a large window, and of course you will need several tools to get the job done. Most people have these tools around the house and they include things like a hammer, screwdriver, chisel, knife, tape measure, square, wood wedges, wood putty, caulking pipe, sandpaper, expansive foam and a lever. Once you have gathered all of your tools, you can proceed to measurement for installation.

No matter what type of window you are using, the essential measurement items are basically the same from unit to unit. It is important that this is done well because everything else you do will come out of this.
When the measurement process begins, you will need to get 6 measurements in total, 3 along the horizontal aspect and 3 along the vertical aspect. Height and width measurements are taken from the window jamb to the window jamb, this basically refers to the inner edge of the window frame. It is important that 3 measurements are taken along both axes, one to the left, middle, and right when measuring height, and one to the top, middle, and bottom when taking measurements for height. You can see that these measurements are not all the same, if this is the case, you should take the smallest height and width measurement, these will be the dimensions of your new window.
The first thing that will be removed will be the window stops, these are the things that hold the window in place within the frame. In older windows, it may be just a case of unscrewing or using a knife to cut the edges. You should try not to damage the window bumpers if possible as they can be reused and save a little extra money.
The next step should be fairly straightforward now that the window stops have been removed, you will need to remove the window frames or window pane, depending on the type of window currently installed. Because the stops hold the window in place, the sash or panel needs to be lifted with very little effort.
Finally, you need to extract the separation beads to allow you to remove the top part of the window sash, if it is a casement window, you often will not have a separation cord in the installation. Now that your window is outside, you can fill in the holes in your window jambs, smooth them out, and prepare them for new windows.
The final part of the process is the most difficult, installing the new replacement window. The first part of the process will be putting a caulking bead along the inside of the outer bumpers, this is where the replacement windows will finally be placed. Then you can go ahead and install the first part of the window, which will be the window header, which needs to be installed in the jamb of the top window.
Next, you'll insert the replacement window unit into the square hole and see if it clicks into place. If the window does not fit well because it is too small, you will need to tap some wooden wedges in place to fit snugly into the hole in the window. Once the window is securely attached, you can screw the window into the jamb to secure it in place.
Now you can go ahead and check if your replacement window works well, try to open and close the main parts of the unit and make sure the parts that shouldn't move don't move.


Comments
Post a Comment